
During the Ultimate Goal season, our team started using the GRiP application to experiment with OpenCV pipelines to be used during autonomous via EasyOpenCV. We found that this lead to much faster development cycles, was a better environment for discovery and learning, allowed us to develop pipelines without a robot, and even without requiring access to a playing field once an initial set of camera images had been captured. This is how it works:
Prerequisites
- Install EasyOpenCV into your FTC code, and get their examples working with your setup. They have excellent, detailed documentation at their GitHub page for the project at https://github.com/OpenFTC/EasyOpenCV/tree/master#documentation and there are many good tutorials via YouTube as well – Wizard.exe’s one from Ultimate Goal at https://www.youtube.com/watch?v=-QFoOCoaW7I is a popular one.
- Install GRiP on your computer from https://github.com/WPIRoboticsProjects/GRIP and work through the tutorials for FRC at https://docs.wpilib.org/en/stable/docs/software/vision-processing/grip/introduction-to-grip.html – specifically “Finding the Yellow Square” which is similar to many vision tasks we encounter in FTC.
- Most computer vision tasks for FTC require the same pipeline steps:
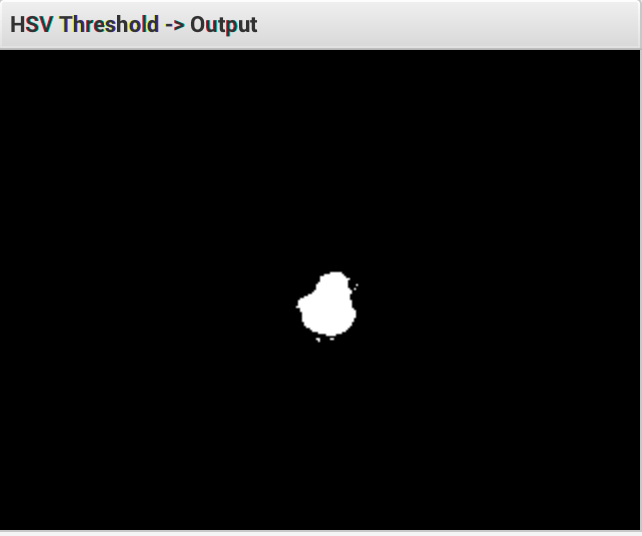
- threshold (usually via HSV)
- blur (to help fill holes – optional)
- dilate (to further help fill holes – optional)
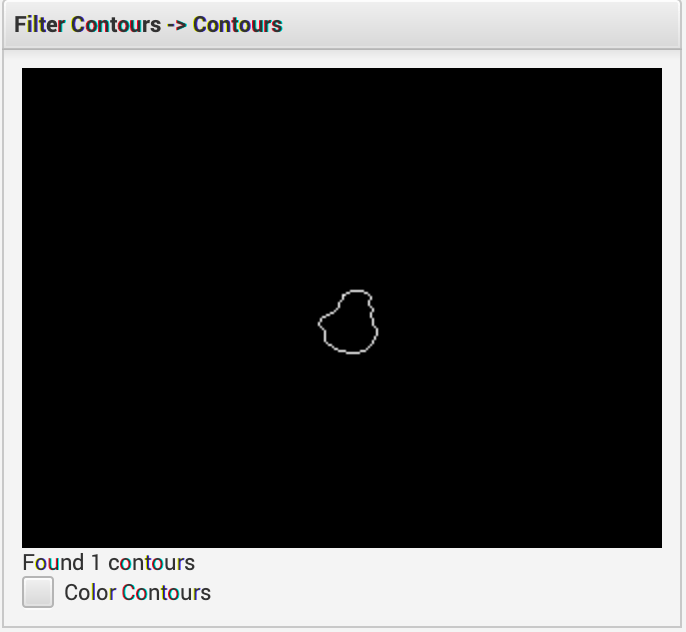
- find contours or blobs
- filter contours or blobs.
While not for FTC, the LimeLight FRC camera documentation covers these concepts pretty well – https://docs.limelightvision.io/en/latest/vision_pipeline_tuning.html#thresholding
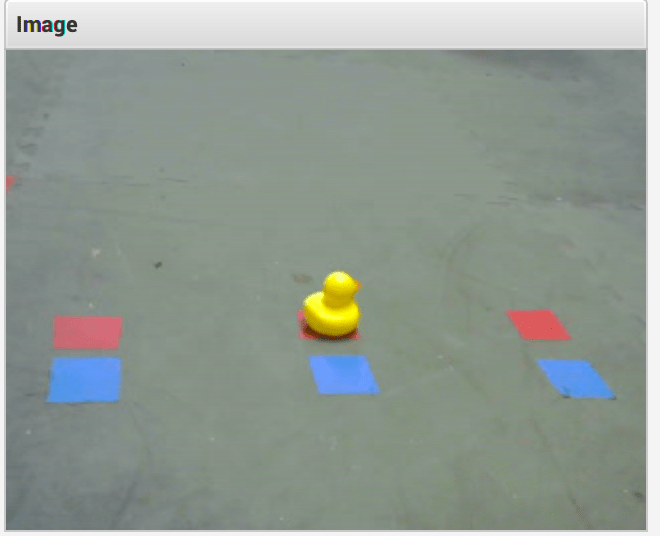
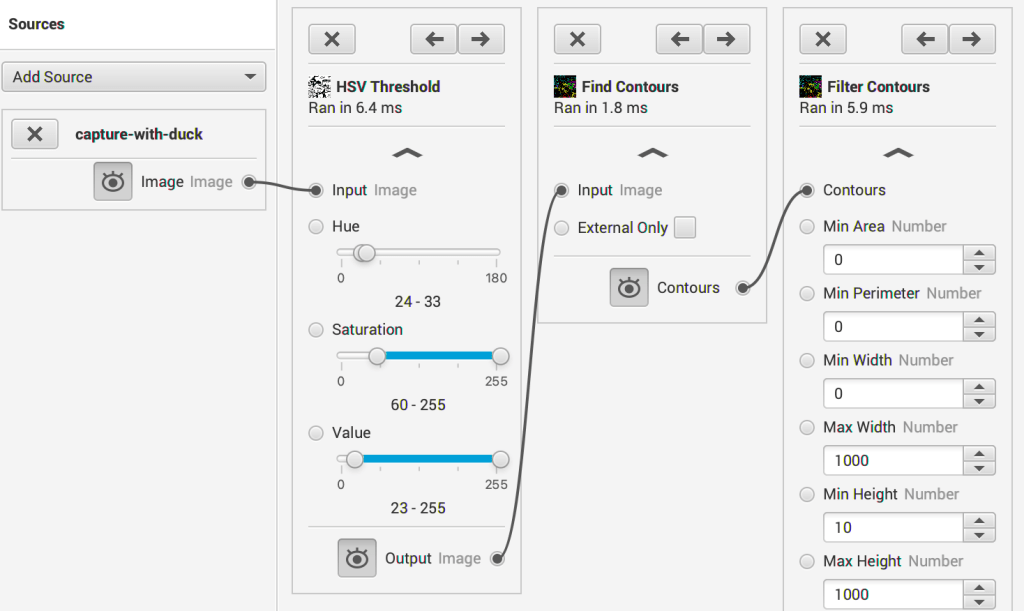
We typically develop a pipeline using GRiP by mounting the camera to the robot, plugging it into a laptop running GRiP. This method allows us to have the same field of view, and thus the same contour sizes as the pipeline will see when running on the robot. It’s also possible to grab frames from the camera, save them as JPEGs and use those as sources for GRiP to do off-line pipeline development. In practice, this is what it looked like for our Freight Frenzy pipeline:

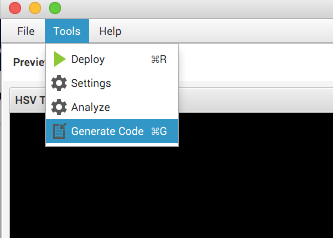
Once a working pipeline has been developed, GRiP can generate Java code that implements the pipeline:
The generated Java code from the GRiP application will look something like this (there will be different code here, depending on how the pipeline was constructed). The two methods that are important, are process(Mat) and the output of filtered contours – filterContoursOutput(). GRiP will add a getter method for the output of each stage of the pipeline that was present in the GUI in the GRiP application:
/**
 * FindDuckContours class.
 *
 * <p>An OpenCV pipeline generated by GRIP.
 *
 * @author GRIP
 */
public class FindDuckContoursNaturalLighting {
    //Outputs

    private Mat hsvThresholdOutput = new Mat();
    private Mat blurOutput = new Mat();
    private Mat cvDilateOutput = new Mat();
    private ArrayList<MatOfPoint> findContoursOutput = new ArrayList<MatOfPoint>();
    private ArrayList<MatOfPoint> filterContoursOutput = new ArrayList<MatOfPoint>();

    /**
     * This is the primary method that runs the entire pipeline and updates the outputs.
     */
    public void process(Mat source0) {
       // A bunch of generated code
    }

....

    /**
     * This method is a generated getter for the output of a Filter_Contours.
     * @return ArrayList<MatOfPoint> output from Filter_Contours.
     */
    public ArrayList<MatOfPoint> filterContoursOutput() {
        return filterContoursOutput;
    }
}
To use this pipeline with EasyOpenCV, from OpenCvPipeline, create a new instance of the class of generated code, and call the process(Mat) method with the frame passed to the EasyOpenCV pipeline in its processFrame(Mat) method. However, keep in mind the following warning in the EasyOpenCV documentation:
IMPORTANT NOTE: EasyOpenCV delivers RGBA frames, but desktop OpenCV (what you may be used to) delivers BGR frames. Beware when porting code between the two!
This will look roughly like this:
import org.opencv.core.Mat;
import org.opencv.core.MatOfPoint;
import org.opencv.core.Point;
import org.opencv.core.Rect;
import org.opencv.core.Scalar;
import org.opencv.imgproc.Imgproc;
import org.openftc.easyopencv.OpenCvPipeline;

import java.util.List;
import java.util.concurrent.atomic.AtomicReference;

import lombok.Builder;
import lombok.Getter;
import lombok.Setter;

public class BarcodeDetectorPipeline extends OpenCvPipeline {

    public enum BarcodePosition {
        LEFT, RIGHT, CENTER, UNKNOWN
    }

    private static final String BARCODE_DETECTOR_TEL_CAPTION = "BcDet";

    private static final Scalar RGB_ORANGE = new Scalar(234, 126, 39);

    private static final Scalar RGB_PURPLE = new Scalar(152, 0, 62);

    private static final Scalar RGB_GREEN = new Scalar(0, 255, 0);

    private final Rect LEFT_ZONE = new Rect(0, 0, 106, 240);

    private final Rect CENTER_ZONE = new Rect(106, 0, 106, 240);

    private final Rect RIGHT_ZONE = new Rect(212, 0, 106, 240);

    private final Telemetry telemetry;

    // This is the pipeline class generated by GRiP

    private final FindDuckContoursNaturalLighting findDuckContours = new FindDuckContoursNaturalLighting();

    private final Mat displayMat = new Mat();

    // Because EasyOpenCV delivers frames on a different thread than the
    // one running the OpMode - use an AtomicReference to safely use
    // the detected position from both threads, without using synchronization

    private final AtomicReference<BarcodePosition> detectedBarcodePosition = new AtomicReference<>(BarcodePosition.UNKNOWN);

    private final Mat bgrMat = new Mat();

    @Setter
    @Getter
    private volatile boolean startLookingForBarcode;

    public BarcodePosition getDetectedPosition() {
        return detectedBarcodePosition.get();
    }

    @Override
    public Mat processFrame(final Mat input) {
        input.copyTo(displayMat);

        // OpenCV expects frames in BGR for things like HSV to work
        // EasyOpenCV sends in RGBA, must convert them before doing anything else

        Imgproc.cvtColor(input, bgrMat, Imgproc.COLOR_RGBA2BGR);

        // This is the pipeline, created in GRiP that isolates the duck in the image
        findDuckContours.process(bgrMat);

        // We'll look through the list of contours of detected ducks, but hopefully there's only one!
        List<MatOfPoint> filteredDuckContours = findDuckContours.filterContoursOutput();

        Imgproc.drawContours(displayMat, filteredDuckContours, -1, RGB_PURPLE, 2);

        // It's easier to deal with rectangles rather than the freeform shape of the duck
        List<Rect> duckBoundingRectangles = Lists.newArrayList();

        for (final MatOfPoint contour : filteredDuckContours) {
            final Rect boundingRect = Imgproc.boundingRect(contour);
            Imgproc.rectangle(displayMat,  boundingRect.br(), boundingRect.tl(), RGB_GREEN, 4);

            duckBoundingRectangles.add(boundingRect);

            final Point duckCenterPoint = centerPoint(boundingRect);
            Imgproc.circle(displayMat, duckCenterPoint, 6, RGB_GREEN);
        }

        // Draw the bar code positions where ducks are expected
        Imgproc.rectangle(displayMat, LEFT_ZONE, RGB_ORANGE, 2);
        Imgproc.rectangle(displayMat, CENTER_ZONE, RGB_ORANGE, 2);
        Imgproc.rectangle(displayMat, RIGHT_ZONE, RGB_ORANGE, 2);

        if (startLookingForBarcode) {
            // Actually do the logic for finding the barcode position if requested.
            //
            // We run the pipeline during init(), to make sure it's working,
            // but we don't look for the randomized game piece until after auto starts

            if (duckBoundingRectangles.size() > 1) {
                detectedBarcodePosition.set(BarcodePosition.UNKNOWN);
            } else if (duckBoundingRectangles.size() == 1) {
                final Rect duckBoundingRect = duckBoundingRectangles.get(0);

                final Point duckCenterPoint = centerPoint(duckBoundingRect);

                if (LEFT_ZONE.contains(duckCenterPoint)) {
                    Imgproc.rectangle(displayMat, LEFT_ZONE, RGB_GREEN, 2);
                    detectedBarcodePosition.set(BarcodePosition.LEFT);
                } else if (CENTER_ZONE.contains(duckCenterPoint)) {
                    Imgproc.rectangle(displayMat, CENTER_ZONE, RGB_GREEN, 2);
                    detectedBarcodePosition.set(BarcodePosition.CENTER);
                } else if (RIGHT_ZONE.contains(duckCenterPoint)) {
                    Imgproc.rectangle(displayMat, RIGHT_ZONE, RGB_GREEN, 2);
                    detectedBarcodePosition.set(BarcodePosition.RIGHT);
                }

            } else {
                detectedBarcodePosition.set(BarcodePosition.UNKNOWN);
            }
        }

        // This makes sure we get output at the driver station
        // which will include the helpful visual information we've
        // added.


        return displayMat;
    }

    private Point centerPoint(final Rect boundingRect) {
        final Point topLeft = boundingRect.tl();
        final Point bottomRight = boundingRect.br();

        final Point centerPoint = new Point(
                topLeft.x + ((bottomRight.x - topLeft.x) / 2),
                topLeft.y + ((bottomRight.y - topLeft.y) / 2));

        return centerPoint;
    }
}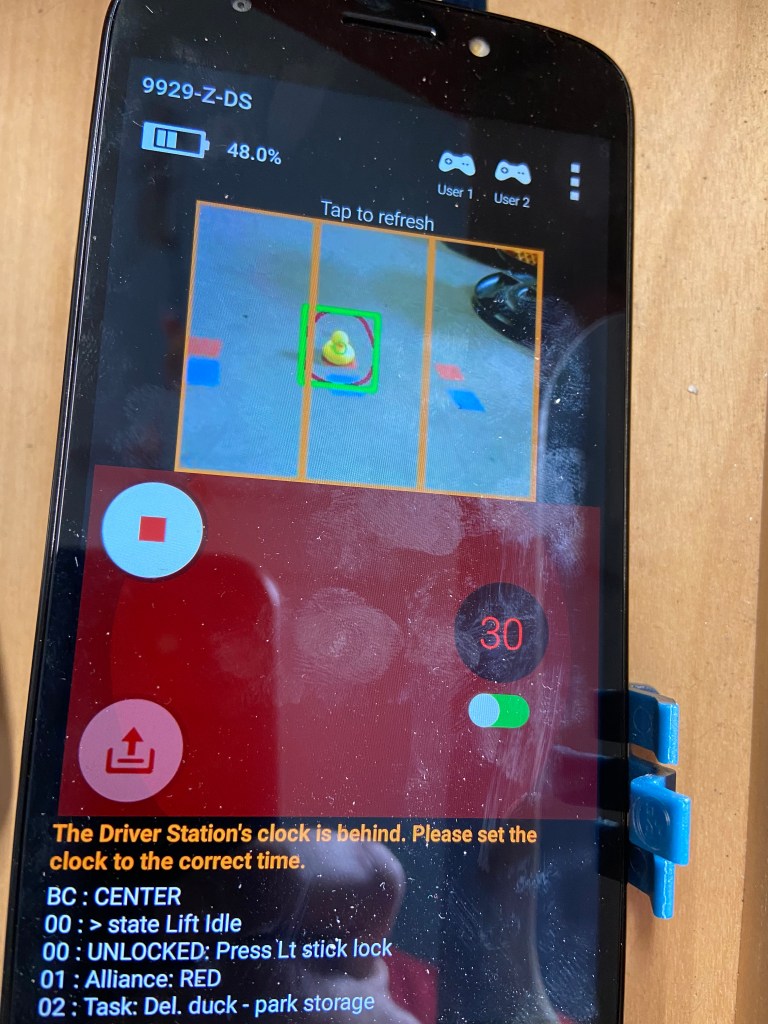
Visually, the display looks like this on the drivers’ station phone. For this particular detection task, the goal was to determine whether the yellow rubber duck is in the left, center or right position – indicated by the orange rectangles on the screen. The pipeline code displays the detected contour after filtering in dark red, and the bounding box and center circle in green.
As we have continued to use this combination over a few seasons, I, as a mentor trying to teach these concepts have found that it is much more approachable for the team members than Tensorflow or VuForia, and enables creativity and exploration that is not possible in either of those environments. If your team is struggling to get consistent results with those computer vision options in FTC – consider giving GRiP and EasyOpenCV a try?
